Installing HashiCorp Vault on DigitalOcean with hashi-up

photo by Jason Pofahl on Unsplash
Introduction

While every IT environment is not the same, secret management is one of the things that remains constant. Whether it is an application, automation script, CI/CD pipeline, they all rely on some form of credentials to access other services or data.
HashiCorp Vault is a prominent tool in this particular area. It is used for securely storing tokens, passwords, certificates, and encryption keys, while it tightly controls access to that data by authenticating against trusted sources of identity.
In this tutorial, you will learn how to install Vault with hashi-up, a small tool I’m working on from time to time, to install the HashiCorp tools on any remote host via SSH. At the start of the project, only Consul and Nomad was supported, but with the latest release, Vault can be installed as well.
Set up a single Vault server on DigitalOcean
There are several ways to provision the resources we need for the tutorial, like using the DigitalOcean dashboard or CLI, or tools like HashiCorp Terraform.
Because we only need a few resources, I’ll continue using the CLI (doctl).
Add your SSH key to your DigitalOcean dashboard, then find out the ID of the SSH key. We will need it later when we are using SSH to install Vault.
$ doctl compute ssh-key list
ID          Name          FingerPrint
28960471    operator      3b:6e:09:b7:d8:ac:84:e1:cf:15:89:e3:3d:13:9e:39
And make it available for the next commands:
export SSH_KEY='28960471'
Provision a new VM with a compatible operating system such as Ubuntu or something else and make sure you a register your SSH key to this new host.
$ doctl compute droplet create --image ubuntu-18-04-x64 --size s-1vcpu-2gb --region lon1 vault --tag-names vault --wait --ssh-keys $SSH_KEY
ID           Name     Public IPv4       Private IPv4    Public IPv6    Memory    VCPUs    Disk    Region    Image                     VPC UUID                                Status    Tags     Features              Volumes
219527892    vault    165.232.109.36    10.106.0.3                     2048      1        50      lon1      Ubuntu 18.04 (LTS) x64    9bdab0c6-776e-413c-95fa-3587ff2daf45    active    vault    private_networking
Next, use hashi-up to bootstrap a Vault server over SSH:
$ hashi-up vault install --ssh-target-addr 165.232.109.36 --version 1.6.0
Uploading Vault configuration and certificates...
Installing Vault...
[INFO]  Creating user named vault
[INFO]  Downloading and unpacking vault_1.6.0_linux_amd64.zip
[INFO]  Creating service file /etc/systemd/system/vault.service
[INFO]  Enabling vault unit
Created symlink /etc/systemd/system/multi-user.target.wants/vault.service → /etc/systemd/system/vault.service.
[INFO]  Starting vault
How does hashi-up install Vault?
- it starts an SSH session to your target host
- it generates a Vault configuration file, based on the commandline flags, and uploads the result via SCP
- on the remote host, it downloads the Vault distribution and places the binary in the correct directory
- it creates a vault user and some directories, like
/etc/vault.dand/opt/vault- it generates a systemd service file for Vault
- it enables and starts this new systemd service
Open a browser and go to http://<public ip>:8200 and, eureka! Time to unseal this freshly installed Vault and start managing those secrets.
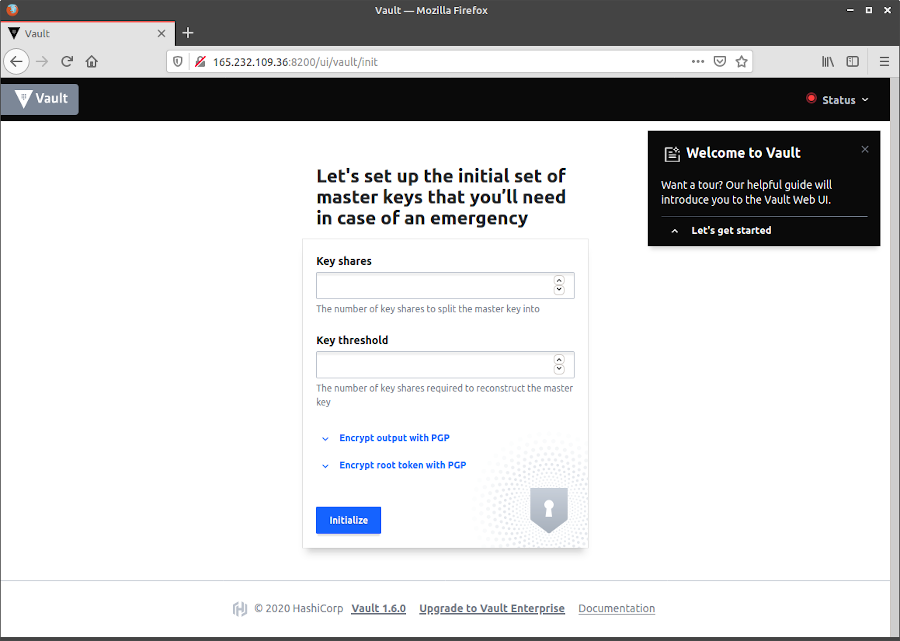
Vault UI
But wait a minute… a secret management tool running with plain HTTP and no HTTPS? That doesn’t sound like a good idea, right?
Grab yourself a certificate or generate a self-signed one with hashi-up:
$ hashi-up cert create --host 165.232.109.36 --host vault.example.com
2020/12/02 17:39:06 wrote server.pem
2020/12/02 17:39:06 wrote server-key.pem
And rerun the previous install command with some extra flags to upload the key and certificate. No worries, it will just update the Vault configuration and restart the service:
$ hashi-up vault install --ssh-target-addr 165.232.109.36 --version 1.6.0 --key-file=server-key.pem --cert-file=server.pem
Uploading Vault configuration and certificates...
Installing Vault...
[INFO]  User vault already exists. Will not create again.
[INFO]  Vault binary already installed in /usr/local/bin, skipping downloading and installing binary
[INFO]  Creating service file /etc/systemd/system/vault.service
[INFO]  Enabling vault unit
[INFO]  Starting vault
Now that’s more like, HTTPS enabled!
Set up an HA Vault cluster on DigitalOcean
A single Vault server is already nice to get started, but if our VM crashes for some reason, our secret management service will suffer a total failure. Vault supports a multi-server mode for high availability. This will protect you against outages and is automatically enabled when using a storage that supports it.
By default, hashi-up will install Vault configured with a Filesystem Backend which lacks support for high availability. But with hashi-up, you have the possibility to select the Consul Storage Backend.
The architecture we aim for is a Vault HA setup consisting of the following:
- Cluster of 3 Consul servers
- 2 Vault servers: 1 active and 1 standby
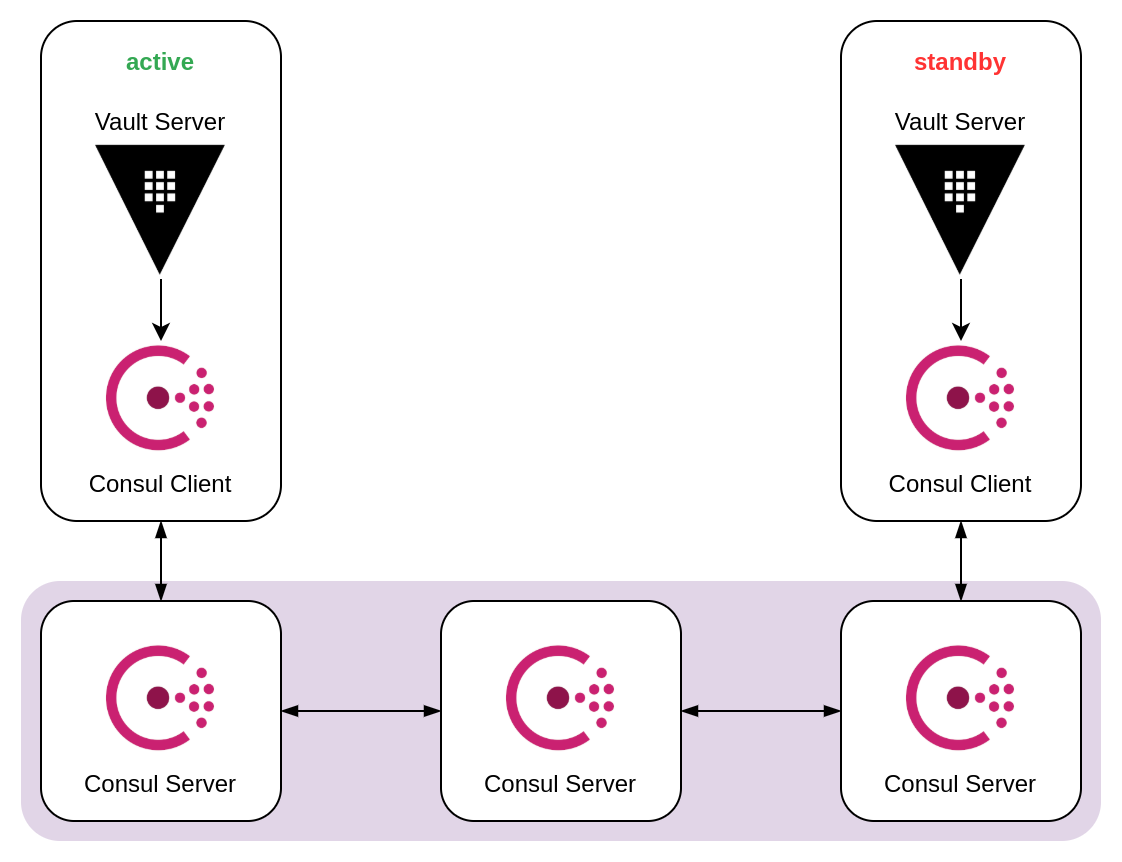
Vault HA with Consul Storage Backend
For this Vault cluster, we will use a dedicated VPC:
$ doctl vpcs create --name vault-ha --region ams3
ID                                      URN                                            Name        Description    IP Range         Region    Created At                                 Default
c0c00111-58ec-46b8-af0c-faaf663c3e7e    do:vpc:c0c00111-58ec-46b8-af0c-faaf663c3e7e    vault-ha                   10.110.0.0/20    ams3      2020-12-05 15:20:27.252353591 +0000 UTC    false
export VPC_ID='c0c00111-58ec-46b8-af0c-faaf663c3e7e'
Create 3 nodes for the Consul servers:
doctl compute droplet create --image ubuntu-18-04-x64 --size s-1vcpu-2gb --region ams3 consul-01 --tag-names consul-server --vpc-uuid $VPC_ID --ssh-keys $SSH_KEY
doctl compute droplet create --image ubuntu-18-04-x64 --size s-1vcpu-2gb --region ams3 consul-02 --tag-names consul-server --vpc-uuid $VPC_ID --ssh-keys $SSH_KEY
doctl compute droplet create --image ubuntu-18-04-x64 --size s-1vcpu-2gb --region ams3 consul-03 --tag-names consul-server --vpc-uuid $VPC_ID --ssh-keys $SSH_KEY
Consul will use the tags attached for automatically joining other nodes using cloud metadata. This feature is called Consul Auto-join.
Create 2 nodes for the Vault servers:
doctl compute droplet create --image ubuntu-18-04-x64 --size s-1vcpu-2gb --region ams3 vault-01 --tag-names vault --vpc-uuid $VPC_ID --ssh-keys $SSH_KEY
doctl compute droplet create --image ubuntu-18-04-x64 --size s-1vcpu-2gb --region ams3 vault-02 --tag-names vault --vpc-uuid $VPC_ID --ssh-keys $SSH_KEY
Now first bootstrap the Consul cluster:
export DO_API_TOKEN=<your token>

export SERVER1=$(doctl compute droplet list | grep consul-01 | tr -s ' ' | cut -d ' ' -f 3)
export SERVER2=$(doctl compute droplet list | grep consul-02 | tr -s ' ' | cut -d ' ' -f 3)
export SERVER3=$(doctl compute droplet list | grep consul-03 | tr -s ' ' | cut -d ' ' -f 3)

hashi-up consul install --ssh-target-addr $SERVER1 \
  --server \
  --advertise "{{ GetInterfaceIP \"eth1\" }}" \
  --bootstrap-expect 3 \
  --retry-join "provider=digitalocean region=ams3 tag_name=consul-server api_token=$DO_API_TOKEN" \
  --client 0.0.0.0

hashi-up consul install --ssh-target-addr $SERVER2 \
  --server \
  --advertise "{{ GetInterfaceIP \"eth1\" }}" \
  --bootstrap-expect 3 \
  --retry-join "provider=digitalocean region=ams3 tag_name=consul-server api_token=$DO_API_TOKEN"

hashi-up consul install --ssh-target-addr $SERVER3 \
  --server \
  --advertise "{{ GetInterfaceIP \"eth1\" }}" \
  --bootstrap-expect 3 \
  --retry-join "provider=digitalocean region=ams3 tag_name=consul-server api_token=$DO_API_TOKEN"
At this moment, you should have a Consul cluster running.
For the Vault cluster, besides a Vault service, also a Consul client needs to be installed:
export SERVER1=$(doctl compute droplet list | grep vault-01 | tr -s ' ' | cut -d ' ' -f 3)
export SERVER2=$(doctl compute droplet list | grep vault-02 | tr -s ' ' | cut -d ' ' -f 3)

export PRIVATE_IP1=$(doctl compute droplet list | grep vault-01 | tr -s ' ' | cut -d ' ' -f 4)
export PRIVATE_IP2=$(doctl compute droplet list | grep vault-01 | tr -s ' ' | cut -d ' ' -f 4)

hashi-up consul install --ssh-target-addr $SERVER1 \
  --advertise "{{ GetInterfaceIP \"eth1\" }}" \
  --retry-join "provider=digitalocean region=ams3 tag_name=consul-server api_token=$DO_API_TOKEN"

hashi-up consul install --ssh-target-addr $SERVER2 \
  --advertise "{{ GetInterfaceIP \"eth1\" }}" \
  --retry-join "provider=digitalocean region=ams3 tag_name=consul-server api_token=$DO_API_TOKEN"

hashi-up vault install --ssh-target-addr $SERVER1 --version 1.6.0 --api-addr http://$SERVER1:8200 --cluster-addr http://$PRIVATE_IP1:8201 --storage consul
hashi-up vault install --ssh-target-addr $SERVER2 --version 1.6.0 --api-addr http://$SERVER2:8200 --cluster-addr http://$PRIVATE_IP2:8201 --storage consul
Now, you can initialize Vault and unseal each server.
$ vault operator init
$ vault operator unseal <unseal_key_x>
This prepares the storage in Consul, which is then addressed by the active Vault server. It also generates a master key and disassemble that master key in several key shares. Each Vault server in the cluster can use these unseal keys, and each Vault server must be unsealed before it can be used.
Unseal both servers and finally verify the HA status.
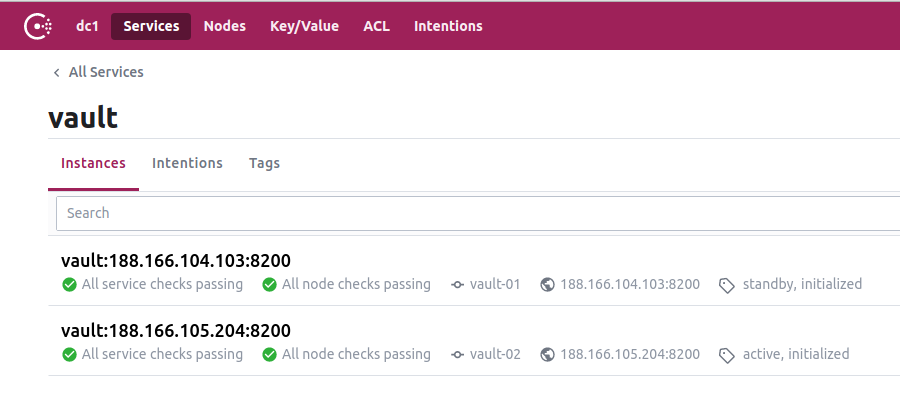
Vault services registered to Consul, both the active as the standby node
Server 1:
$ vault status
Key             Value
---             -----
Seal Type       shamir
Initialized     true
Sealed          false
Total Shares    1
Threshold       1
Version         1.6.0
Storage Type    consul
Cluster Name    vault-cluster-d698e865
Cluster ID      b955f670-59ad-4fc2-ad30-fac83746c9fa
HA Enabled      true
HA Cluster      https://10.110.0.5:8201
HA Mode         active
Server 2:
$ vault status
Key                    Value
---                    -----
Seal Type              shamir
Initialized            true
Sealed                 false
Total Shares           1
Threshold              1
Version                1.6.0
Storage Type           consul
Cluster Name           vault-cluster-d698e865
Cluster ID             b955f670-59ad-4fc2-ad30-fac83746c9fa
HA Enabled             true
HA Cluster             https://10.110.0.5:8201
HA Mode                standby
Active Node Address    http://188.166.104.103:8200
Is this a production-ready installation? Not exactly. Although we have covered a potentional outage during a node failure, the set up created during this tutorial is far from a production hardened installation. Some other configuration should put in place to make this production ready, like TLS certificates, Consul encryption and ACLs.
Wrapping up
With hashi-up, we created not only a single node Vault server with the Filesystem Storage Backend, but also a fault-tolerant, high availability Vault cluster running on top of a Consul cluster.
The tools and techniques we used here can also be applied to other cloud platforms, such as AWS, Google Cloud and Azure, or even in your home lab with some Raspberry Pis.
Vault and Consul are not the only services that can be installed with hashi-up. If you are interested in installing a Nomad cluster, check out the GitHub repo.
See also:
- Deploying a highly-available Nomad cluster with hashi-up
- Building a Nomad cluster on Raspberry Pi running Ubuntu server
References:
cloud-nativedevopsrpiRaspberry Pivaultconsulhashicorphomelabhashi-upSecret Management
1540 Words
Dec 05, 2020