Scale out your Raspberry Pi Nomad cluster to the cloud

illustration by blackboard on Bigstock
Intro
A few months ago, I stumbled upon a blog post written by Christophe Voigt about how he managed to scale out a Raspberry Pi Kubernetes cluster to the cloud with Tailscale.
In a nutshell:
- He grabbed a couple of Raspberry Pis and created a k3s cluster by following the instructions of Alex Ellis.
- After learning about Tailscale, a “no config” private networking solution based on Wireguard, allowing encrypted P2P communication between hosts, across NAT, firewalls, and other networking hurdles, he saw entirely new possibilities. Every machine capable of running k3s and Tailscale can join his k3s cluster, no matter where it’s location is.
- He was able to build a setup to add and remove nodes of various cloud providers - all via configuration.
I do recommend reading his full stories as it explains in details how he achieved his goals.
Now, as I also fancy some Raspberry Pis and happen to have a cluster running HashiCorp Consul and Nomad, I was wondering what it would take to scale out my Nomad cluster to the cloud using the same techniques.
What options do we have?
Our requirements are equally simple: we need some kind of operator that will automatically create VMs of a cloud vendor. Those machines need to start Tailscale, join the network, set up Consul and Nomad, and of course eventually join the cluster.
As explained by Christophe, in the Kubernetes ecosystem are some operators available that will meet those requirements (e.g. Kubermatic Machine Controller or Gardener Machine Controller Manager). But unfortunately, those tools have no support for HashiCorp Nomad.
Then I realized that one of the latest announcement of HashiCorp was the availability of a Nomad Autoscaler. Not only can it scale Nomad jobs, but it has also support to scale cluster nodes if required. Could this tool, also brought forward by HashiCorp, mean something for my use case?
It turned out that it is a perfect fit for what I was looking for.
Preparing the Raspberry Pi cluster
The first thing to do was making some changes to the Consul and Nomad cluster I had already running on the Raspberry Pis. Because other external VMs will join this cluster through Tailscale, it is quite evident that it needs to be installed on the machines in the home lab as well.
In my case, the Pis are running Ubuntu 20.04, which is like many other Linux distributions supported by Tailscale. Installing this software is just a matter of executing some commands:
#!/bin/bash
set -e

TAILSCALE_AUTH_KEY=<your tailscale auth key>

echo "Installing Tailscale"

curl https://pkgs.tailscale.com/stable/ubuntu/focal.gpg | sudo apt-key add -
curl https://pkgs.tailscale.com/stable/ubuntu/focal.list | sudo tee /etc/apt/sources.list.d/tailscale.list

sudo apt-get update
sudo apt-get install tailscale

sudo tailscale up --authkey $TAILSCALE_AUTH_KEY

echo "Tailscale installation finished."
Now that all these nodes have joined the Tailscale network, the next task is configuring Consul and Nomad with this the newly available network interface tailscale0. When Consul and Nomad are advertising the Tailscale IP address to other peers in the group, we are sure they can join each other.
Changing the configuration of Consul and Nomad a little bit did the trick.
Have a look at the following snippet of the configuration of the Consul and Nomad client agents (not everything is displayed, other parts of the config are left out for brevity)
consul.hcl:
bind_addr      = "{{ GetInterfaceIP \"tailscale0\" }}"
advertise_addr = "{{ GetInterfaceIP \"tailscale0\" }}"
client_addr    = "0.0.0.0"
retry_join     = ["100.88.118.99"] // the address in the Tailscale network of our server node
nomad.hcl:
advertise {
  http = "{{ GetInterfaceIP \"tailscale0\" }}"
  rpc  = "{{ GetInterfaceIP \"tailscale0\" }}"
  serf = "{{ GetInterfaceIP \"tailscale0\" }}"
}
client {
  enabled           = true
  node_class        = "hashistack-rpi"
  network_interface = "tailscale0"
  network_speed     = 1000
}
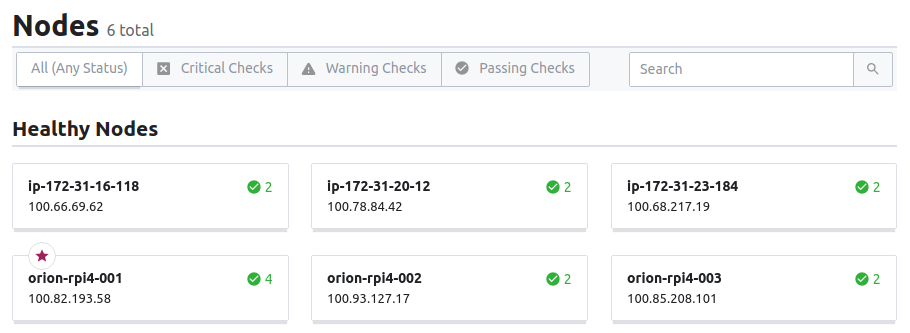
After restarting all the services, the private cluster is now ready to accept nodes running in the cloud.

all the Raspberry Pi nodes are healthy
Nomad Autoscaler
In the first quarter of this year, HashiCorp announced a Tech Preview of the HashiCorp Nomad Autoscaler and in the meanwhile, a beta version is already available for use. While the tech preview brought us horizontal application autoscaling features, the beta release also included the capability to horizontally scaling the cluster. With this feature, you can automatically add or remove clients from the Nomad cluster as the load changes. At the time of writing, they only support Autoscaling Groups on AWS, but I’m pretty sure other cloud providers will be available sooner or later.
Under the hood, the Nomad Autoscaler provides a plugin system:
- ARM plugins to gather metrics to make scaling decisions
- Target plugins to perform the actual scaling actions
- Strategy plugins implement the logic dictating when and how to scale a particular target
The interaction between those plugins is illustrated in this figure:
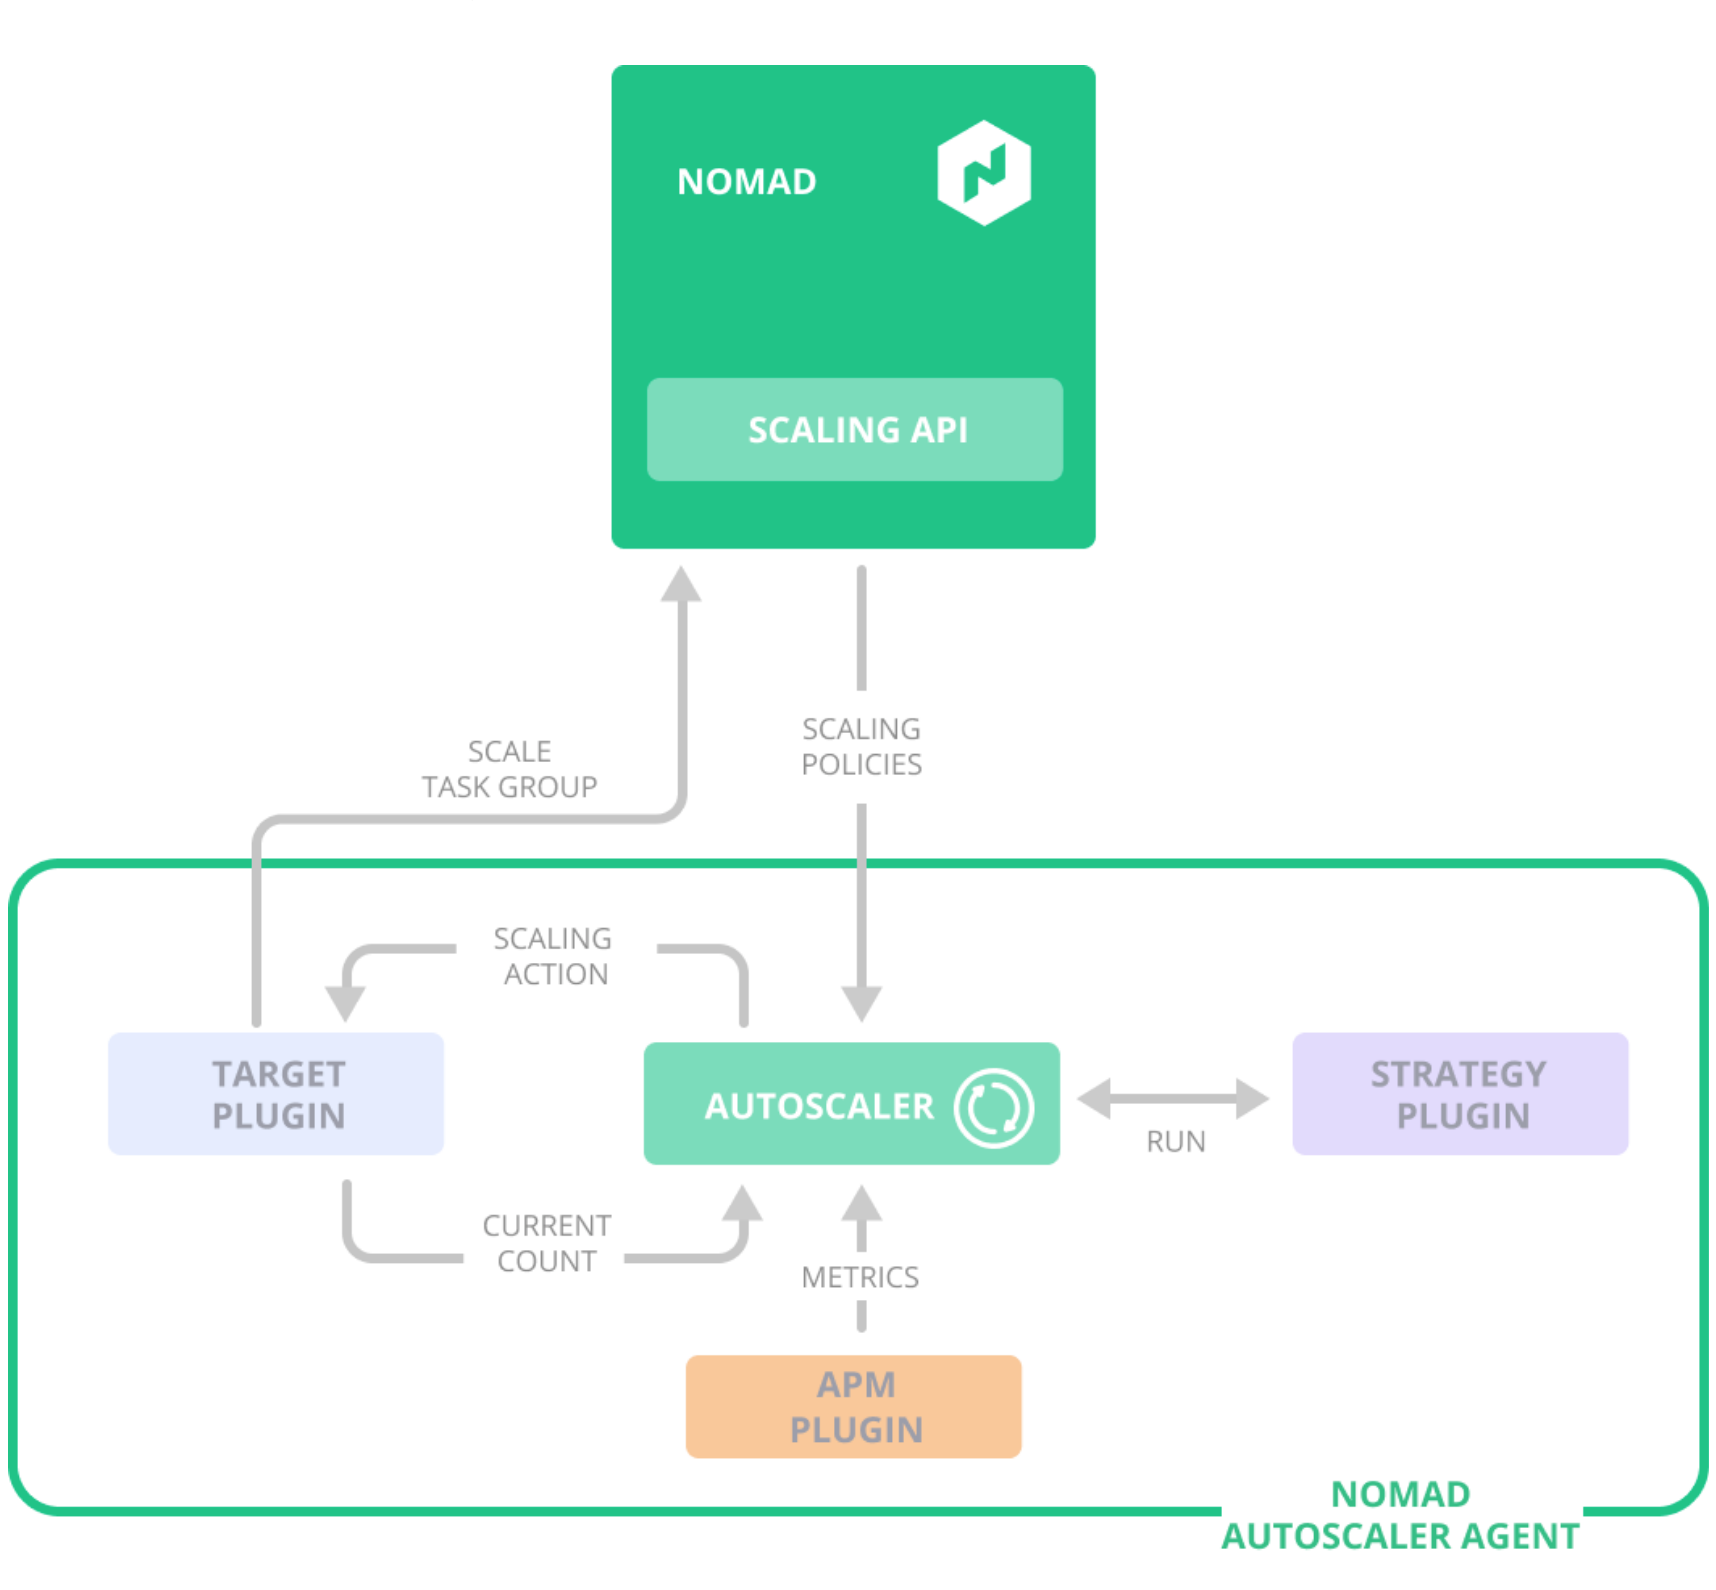
illustration of the interaction between the Nomad Autoscaler, its plugins, and Nomad’s APIs. (source: HashiCorp Blog)
So, what does it takes to scale our private Nomad cluster to the cloud?
Setup the AWS Autoscaling Group
First, we need to create an Autoscaling Group on AWS. I prefer Terraform to create those necessary cloud resources. You can find the Terraform manifests in my Github repository.
After applying those Terraform manifests, we will have the following AWS resources:
- credentials for a technical user including a sufficient set of IAM permissions
- security groups for our Nomad clients
- a launch template for our instances
- the actual Autoscaling Group
EC2 User data
As the Nomad Autoscaler will only add or remove nodes by manipulating the AWS Autoscaling Group, it doesn’t mean it will automatically join our Consul and Nomad cluster. The make sure new nodes will become fully functional Nomad clients, the required agents need to be started when an instance is booted.
The user data in the launch template contains all the necessary steps to install Tailscale and the Consul and Nomad clients, including joining the Tailscale network and the cluster. The script I use is available in the Github repository. At this moment, I chose to put all those steps in the user data; an improvement here could be using Packer to build a new AMI with all the software installed. Such a pre-baked image could reduce the startup time of the new nodes.
Just like Christophe, I currently write the Tailscale auth key in plain text in the user data. Proper secret management should be put in place here. Vault perhaps?
Preparing a secret in Vault
Besides Consul and Nomad, I’m also running Vault on the Raspberry Pis home lab. As a result, the Nomad jobs can pull secret from Vault when they start. The Nomad Autoscaler will need the AWS credentials, created by Terraform, to access the AWS API when manipulating the AWS Autoscaling Group. The secret will contain the AWS Access Key ID and the AWS Access Key Secret.
Authenticate with the Vault CLI and create the secret:
jsiebens@orion$ vault secrets enable -version=2 kv
Success! Enabled the kv secrets engine at: kv/
jsiebens@orion$ vault kv put kv/autoscaler aws_access_key_id=<your id> aws_secret_access_key=<your secret>
Key              Value
---              -----
created_time     2020-08-12T15:33:33.041118515Z
deletion_time    n/a
destroyed        false
version          1
jsiebens@orion$
Next, create a policy for the job that will allow it to read the credentials:
path "kv/data/autoscaler" {
  capabilities = ["read"]
}
jsiebens@orion$ vault policy write autoscaler autoscaler-policy.hcl
Success! Uploaded policy: autoscaler
jsiebens@orion$
Running the Nomad Autoscaler
Now that our Autoscaling Group is available, we can set up the Nomad Autoscaler.
First, deploy a Prometheus instance that we will use as the APM plugin for the scaler. Prometheus is configured in such a way, that it will scrape all Nomad clients metrics. Those metrics are used to decide of nodes should be added or removed. Makes sense, right?
As the Nomad clients on AWS can come and go while scaling up and down, I want to make sure that the autoscaling jobs are running on my Raspberry Pis. By giving the Nomad clients in the home lab and on AWS a different node_class, and adding a constraint in the job definitions, we tell the Nomad scheduler on which nodes the jobs can be scheduled.
job "autoscaler" {
  datacenters = ["dc1"]

  constraint {
    attribute = "${node.class}"
    value     = "hashistack-rpi"
  }

  ...
}
Next, we will start the Autoscaler as a Nomad job too. Unfortunately, a Docker image of the Nomad Autoscaler is not (yet) available for the arm64 architecture. But, as you might know, Nomad is also able to run non-containerized applications, and the scaler is already cross-compiled for multiple platforms, such as arm64.
job "autoscaler" {
  datacenters = ["dc1"]

  group "autoscaler" {

    task "autoscaler" {
      driver = "exec"

      artifact {
        source = "https://releases.hashicorp.com/nomad-autoscaler/0.1.0/nomad-autoscaler_0.1.0_linux_arm64.zip"
      }

      config {
        command = "nomad-autoscaler"

        args = [
          "agent",
          "-config",
          "${NOMAD_TASK_DIR}/config.hcl",
          "-http-bind-address",
          "0.0.0.0",
          "-policy-dir",
          "${NOMAD_TASK_DIR}/policies/",
        ]
      }

      ...

    }
  }
}
Apply the autoscaler Nomad job, and there you have it! As soon the job is started, you see it will check the configured metrics regularly and validate if it should add or remove new clients.
jsiebens@orion$ nomad run nomad/autoscaler.nomad
==> Monitoring evaluation "124b4a8a"
    Evaluation triggered by job "autoscaler"
    Evaluation within deployment: "be758f7d"
    Allocation "38f3e8cb" created: node "77be9f1f", group "autoscaler"
    Evaluation status changed: "pending" -> "complete"
==> Evaluation "124b4a8a" finished with status "complete"
additional clients running on AWS are joining the cluster
Remaining issues
With the current setup, the Nomad Autoscaler will add or remove new instances when required, but unfortunately, I didn’t find a way to somehow downscale to zero clients. So for the moment, there is always one instance available in the instance group. As soon I find the time, I’ll have a closer look on how to fix this, because now I will have some AWS costs for the idle instances.
I’m also still removing deprecated machines from the Tailscale admin panel, as there is no API available the remove nodes from the network. Christophe raised a feature request on finding a way to automate the removal of those nodes.
update May 18, 2021 TIL, Tailscale has added a feature called “Emphemeral Keys”. Such keys are a perfect fit for this scenario as they are able to authenticate many machines, which are automatically removed shortly after going offline.
Final thoughts
With the Nomad Autoscaler, I’m now able to add and remove nodes on Amazon Web Services. The networking part of this exercise is handled almost without any effort by Tailscale. Although it is still in beta, the scaler looks very promising. With a quite flexible plugin system, it can be configured to control different scaling groups based on various metrics and strategies.
I’m looking forward to seeing other cloud providers added as a potential target.
update May 18, 2021 Meanwhile, other targets such as Google Cloud Engine Managed Instance Groups and Azure Virtual Machine Scale Sets are available for the autoscaler.
See also:
- Deploying a highly-available Nomad cluster with hashi-up
- Building a Nomad cluster on Raspberry Pi running Ubuntu server
- Consul Service Mesh across a private Raspberry Pi and a public Cloud
References: