Argo CD for your private Raspberry Pi k3s cluster

photo by Patryk Grądys on Unsplash
k3s, a lightweight Kubernetes. Smaller, but just as powerful. Certified and fully compliant. Perfect candidate for fitting on your edge ore IoT infrastructure. No wonder it is the favourite go-to distribution for many of us when building a Kubernetes cluster on Raspberry Pis.
Argo CD, a declarative, GitOps continuous delivery tool for Kubernetes. Accelerates deployment and lifecycle management of applications. Supports a variety of configuration management tools, like Kustomize and Helm.
Unfortunately, at the time of writing, Argo CD has not distributed Docker images for ARM devices such as the famous Raspberry Pi. They are working hard to support ARM architectures, but for the time being, you need to find another way to get some GitOps for your k3s on Raspberry Pis.
In this tutorial, we will install Argo CD on a low-cost cloud VM, and register a private k3s installation to it via a secure tunnel.
Building the private k3s cluster
For this post, we will consider a k3s cluster on a Raspberry Pi as our main target for running some applications. So let get it up and running first.
Grab yourself a Raspberry, download the latest version of Raspios (formerly known as Raspbian), flash it to an SD card, make sure you enable SSH with an ssh file in the boot partition, and boot the small computing unit.
During this tutorial, let’s imagine that the Pi will have 192.168.0.100 as its IP address.
First, copy your SSH to the target device, cause that will be required for the next step.
ssh-copy-id [email protected]
Now we are ready to install k3s, the lightweight Kubernetes distribution. To do this, we will use a small tool k3sup, created by Alex Ellis, which allow you to install k3s to any kind of node via SSH, hence the SSH keys.
$ k3sup install --ip 192.168.0.100 --user pi --context k3s-rpi --merge
A few moments later, k3s is running and in your working directory, a kubeconfig file is created by k3sup which you can use to access the cluster.
For this tutorial, we will create a single node k3s cluster, but if you still have some spare Raspberry Pis available, you can always add additional nodes to get some more compute power. Installing and joining such nodes can also be done with k3sup.
Our main cluster is now ready to run some applications, but our goal is to do some GitOps with Argo CD.
Installing Argo CD on a cloud VM
For the cluster running Argo CD, start by creating a VM on one of your favourite cloud providers, like DigitalOcean or Scaleway. If you prefer to use a managed Kubernetes service, you can, of course, but for this tutorial, I choose to spin up a lightweight k3s cluster on a small instance to reduce cost. A small, low-cost VM is good enough for running an Argo CD instance for controlling a private home lab.
Let’s say we have created a Droplet on DigitalOcean with a public IP 178.62.252.19. Just like with the Raspberry Pi, we will bootstrap a k3s server with k3sup, so be sure you can access the machine with SSH.
k3sup install --ip 178.62.252.19 --user root --context k3s-argocd --merge --k3s-extra-args '--no-deploy traefik'
Traefik is explicitly excluded during the installation, as only Argo CD will be running on this small Kubernetes cluster.
Because of the --merge flag, your kubeconfig will have an additional context, pointing to the cluster on the cloud VM. You can verify this with kubectx
$ kubectl config get-contexts
CURRENT   NAME         CLUSTER      AUTHINFO      NAMESPACE
          k3s-argocd   k3s-argocd   k3s-argocd
*         k3s-rpi      k3s-rpi      k3s-rpi
Switch to this new context, and continue with installing Argo CD following the steps describe here.
kubectl config use-context k3s-argocd
kubectl create namespace argocd
kubectl apply -n argocd -f https://raw.githubusercontent.com/argoproj/argo-cd/stable/manifests/install.yaml
kubectl patch svc argocd-server -n argocd -p '{"spec": {"type": "LoadBalancer"}}'
Wait a few minutes until all Argo CD pods are healthy and running. As soon that’s the case, you can access the UI via https, in my case https://178.62.252.19.
If you haven’t installed the Argo CD CLI before, now it is the right time to do so.
When you have the CLI ready, authenticate with the CLI with the initial autogenerated password. Instructions on who to find the password are available here.
At this moment, we have a working Argo CD installation and if we want to, we can start deploying applications on this cluster that Argo CD is running in. But our goal is to let Argo CD deploy our apps on the private k3s cluster we have set up before. So next, we have to register private this cluster to Argo CD somehow.
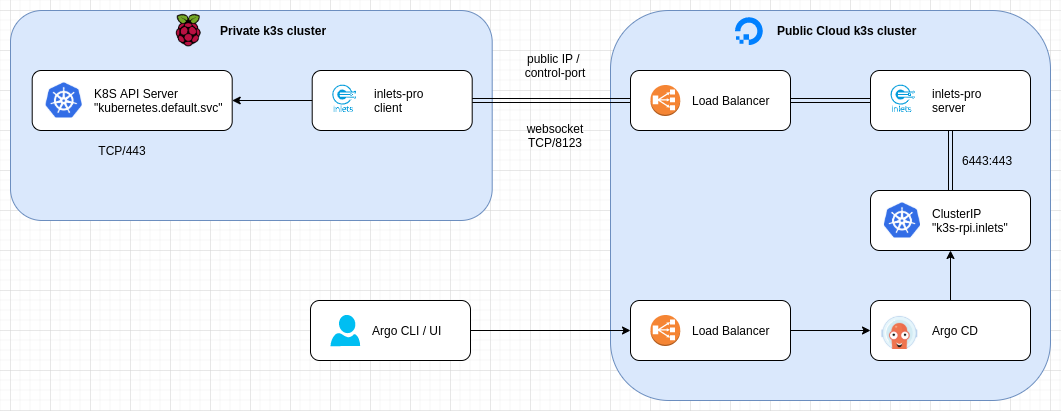
It should be clear that the GitOps delivery tool we have running on a cloud VM is not able to access the private cluster on our Raspberry Pi. We have to punch out the private Kubernetes API server to the cluster in the cloud.
Building a tunnel with inlets PRO
inlets-pro is a Cloud Native Tunnel for L4 TCP traffic, which we will use to expose our private Kubernetes API server to Argo CD.
From the GitHub page of inlets-pro:

Given the split control- and data-plane, you can also punch out endpoints into a remote cluster, which are kept private from the Internet, for instance when you need Command & Control, or orchestration of on-premises services, from a central cloud cluster.
Pretty neat right? Looks like it will perfectly fit our needs.
(Based on a diagram of inlets, by OpenFaas Ltd)
The Kubernetes API server must not be exposed on the Internet, and we will use a split-plane where only the control-plane of inlets-pro is public. From within our destination cluster, Argo CD can access the server via a private ClusterIP.
The server part of the tunnel
Let’s first set up the server part of the tunnel, also known as an exit-node, on our little k3s cluster running in the cloud. For this, we create a dedicated namespace and apply a deployment for the inlets server:
kubectl config use-context k3s-argocd
kubectl create namespace inlets
kubectl apply -f inlets-pro-server.yaml
apiVersion: apps/v1
kind: Deployment
metadata:
  name: inlets-server
  namespace: inlets
spec:
  replicas: 1
  selector:
    matchLabels:
      app: inlets-server
  template:
    metadata:
      labels:
        app: inlets-server
    spec:
      containers:
      - name: inlets-server
        image: ghcr.io/inlets/inlets-pro:0.9.1
        imagePullPolicy: IfNotPresent
        securityContext:
          allowPrivilegeEscalation: false
          runAsUser: 0
        command: ["inlets-pro"]
        args:
        - "tcp"
        - "server"
        - "--auto-tls=true"
        - "--auto-tls-san=178.62.252.19"
        - "--token=<your auth token>"
        volumeMounts:
          - mountPath: /tmp/certs
            name: certs-volume
      volumes:
        - name: certs-volume
          emptyDir: {}
Some attention points here:
- we are running the pod as
root, cause we are going to expose a server on port 443 - set the Common Name to your public IP address, for the TLS certificate
Next, create a service that will make the control-plane port of inlets available for clients to connect to.
apiVersion: v1
kind: Service
metadata:
  name: inlets-control
  namespace: inlets
  labels:
    app: inlets-server
spec:
  type: LoadBalancer
  ports:
    - name: inlets-control
      port: 8123
      protocol: TCP
      targetPort: 8123
  selector:
    app: inlets-server
Finally, create a private ClusterIP service, to which Argo CD will connect within its cluster:
apiVersion: v1
kind: Service
metadata:
  name: k3s-rpi
  namespace: inlets
  labels:
    app: inlets-server
spec:
  type: ClusterIP
  ports:
    - name: k3s-rpi
      port: 6443
      protocol: TCP
      targetPort: 443
  selector:
    app: inlets-server
The client part of the tunnel
Ok, now that the server part is ready to accept connections, it is time to create the client node of the tunnel.
On the private cluster running on the Raspberry Pi we will also create a dedicated namespace for inlets and start the inlets client as a pod. Traffic will be forwarded to kubernetes.default.svc, which is the api server of our private k3s instance.
kubectl config use-context k3s-rpi
kubectl create namespace inlets
kubectl apply -f inlets-pro-client.yaml
apiVersion: apps/v1
kind: Deployment
metadata:
  name: inlets-client
  namespace: inlets
spec:
  replicas: 1
  selector:
    matchLabels:
      app: inlets-client
  template:
    metadata:
      labels:
        app: inlets-client
    spec:
      containers:
      - name: inlets-client
        image: ghcr.io/inlets/inlets-pro:0.9.1
        imagePullPolicy: IfNotPresent
        command: ["inlets-pro"]
        args:
        - "tcp"
        - "client"
        - "--url=wss://178.62.252.19:8123/connect"
        - "--upstream=kubernetes.default.svc"
        - "--port=443"
        - "--token=<your auth token>"
        - "--license=<your inlets license>"
And that’s it! Nothing more to do for the tunnel.
Now, if you would create a pod in the Ago CD cluster, you will be able to reach the private Kubernetes API server using the address: https://k3s-rpi.inlets:6433
Register the private cluster to Argo CD
With the tunnel up and running, we can register the private cluster to Argo CD.
Registering a cluster is done using the Argo CD CLI, based on your current kubeconfig.
First list all clusters contexts in your current kubeconfig:
$ argocd cluster add
ERRO[0000] Choose a context name from:
CURRENT  NAME        CLUSTER     SERVER
         k3s-argocd  k3s-argocd  https://178.62.252.19:6443
*        k3s-rpi     k3s-rpi     https://192.168.0.100:6443
Choose the right context name from the list and supply it to argocd cluster add CONTEXTNAM.
But, here is a tricky part. In our current kubeconfig, the private cluster will have an endpoint with the IP address of the Raspberry Pi, https://192.168.0.100:6443. The CLI will use this endpoint for two things: to install a ServiceAccount with the required admin-level permission, and to register the new cluster on Argo CD with that endpoint. The latter will fail, cause that endpoint is not accessible from within the cluster; hence the tunnel we created earlier.
To fix this, edit your kubeconfig and replace the endpoint https://192.168.0.100:6443 with https://k3s-rpi.inlets:6443 which is the cluster internal endpoint for our private cluster.
When you try the Argo CD CLI command again, it will most likely fail cause k3s-rpi.inletswill not resolve on your local machine. I couldn’t find a better hack to fix this by making sure k3s-rpi.inlets will resolve to the IP address of the Raspberry Pi. As I’m mostly working on Linux, I added the entry temporary in my /etc/hostsfile, as you can see here:
127.0.0.1       localhost
127.0.1.1       orion

# The following lines are desirable for IPv6 capable hosts
::1     ip6-localhost ip6-loopback
fe00::0 ip6-localnet
ff00::0 ip6-mcastprefix
ff02::1 ip6-allnodes
ff02::2 ip6-allrouters

192.168.0.100   k3s-rpi.inlets
Now the CLI can reach the private cluster via k3s-rpi.inlets:
$ argocd cluster add k3s-rpi
INFO[0000] ServiceAccount "argocd-manager" created
INFO[0000] ClusterRole "argocd-manager-role" created
INFO[0000] ClusterRoleBinding "argocd-manager-role-binding" created
Cluster 'https://k3s-rpi.inlets:6443' added
$
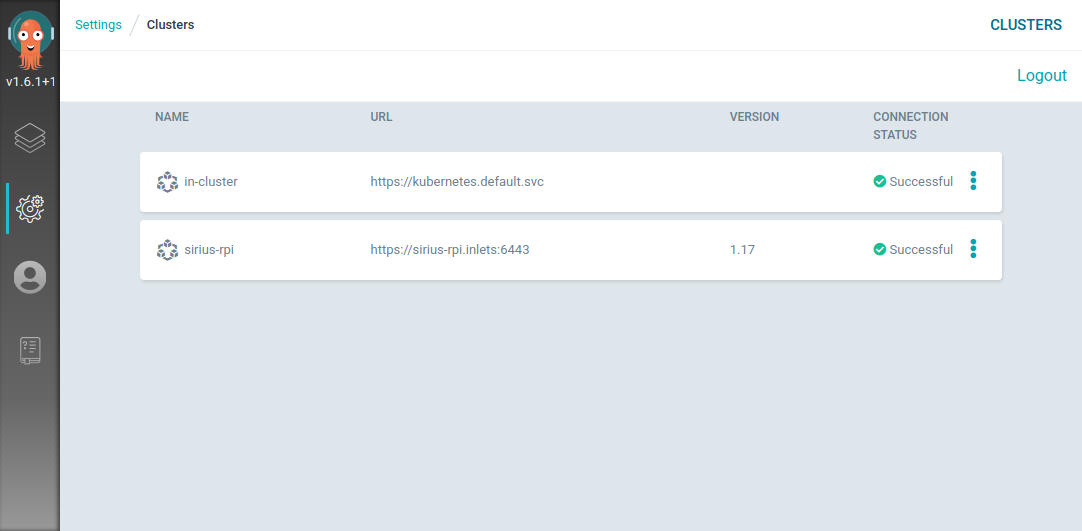
Our Raspberry Pi cluster registered in Argo CD
What’s next?
Now it’s up to you.
We have a working k3s cluster on a Raspberry Pi, and we can leverage Argo CD to deploy our Kubernetes resources on that cluster.
So, get coding, build some stuff, create a Helm chart or a Kustomize template for it, and register the application on Argo CD. But don’t forget: your target cluster is running on a Raspberry Pi, so make sure you build multi-arch Docker images, or at least for the ARM architecture.
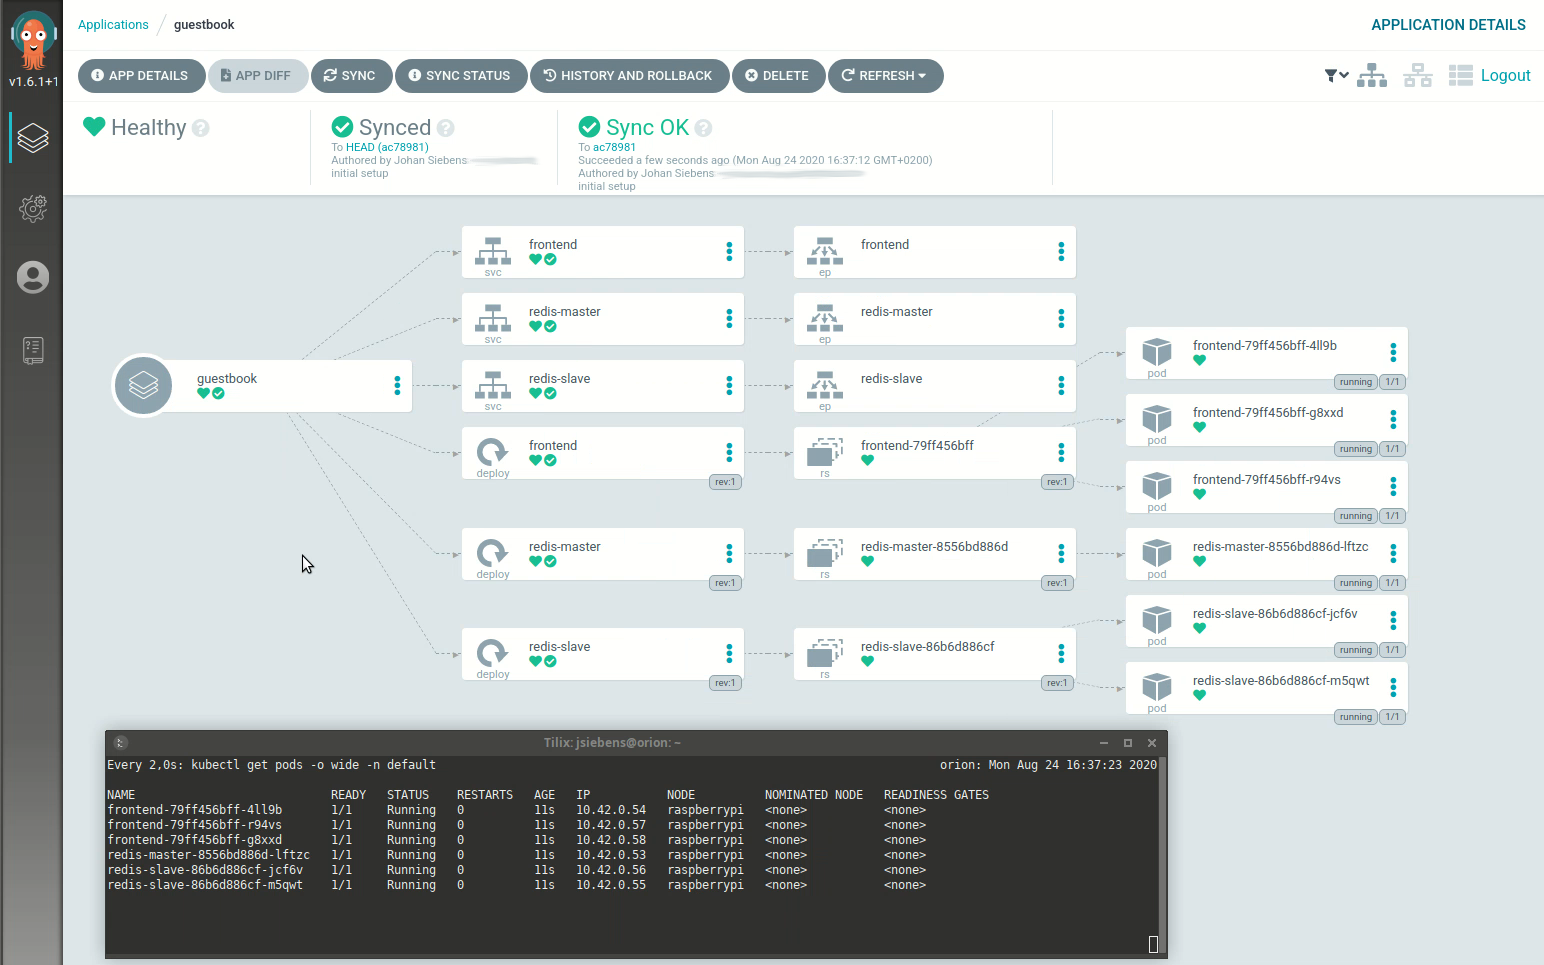
For demo or testing purposes, you can always have a look at a guestbook application.
Or, bootstrap some other clusters and register all of them to Argo CD. By doing so, you will have a centralized deployment tool which let you manage all your software delivery to multiple clusters from a single pane of glass.
References: