Secure access using HashiCorp Boundary & inlets PRO Better Together

photo by Nguyen Dang Hoang Nhu on Unsplash
A few weeks ago, I had the pleasure to join Hashicorp’s second fully virtual conference, HashiConf Digital 2020. Leading to this online conference, they were teasing all of us with the announcement of two new Open Source products. Spread over two keynotes, Armon and Mitchell gave an introduction to those highly kept secret products, Boundary and Waypoint.
I haven’t looked at Waypoint in detail yet, but here I want to talk specifically about Boundary and what it is. And of course, if you read my previous posts, I couldn’t resist to see if this new project can be of any use in my private Raspberry Pi home lab.
What is HashiCorp Boundary?

Boundary is a new open source project that enables clients to securely access dynamic hosts and services with fine-grained authorization without requiring direct access to your private network. With Boundary, a user first needs to authenticate using a trusted Identity Provider. Boundary then uses policies and RBAC to define what services authenticated clients can access on a particular network based on their identity.
It is a modern and a more dynamic approach to give secure access to your resources compared to more traditional approaches like SSH bastion hosts or VPNs
In a traditional approach, on-boarding and giving operators access to the machines would typically involve some things to do. For starters, maybe a new VPN profile or a new SSH key needs to be created, which can become hard to manage at scale when more and more people need to be on-boarded. The second subject to consider is to put the required firewall rules in place that allow the operators to only access to appropriate hosts. Such firewalls mostly assume resources are more static, and it is not well suited for the cloud with highly ephemeral and dynamic environments.
Boundary was designed with these core problems in mind: grant access to critical systems with least privilege.
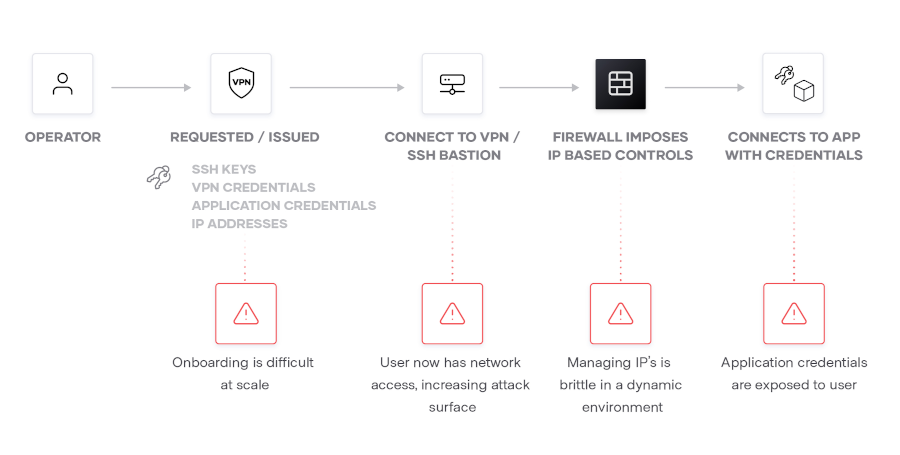
A traditional access model with shortcomings solved by Boundary (source: HashiCorp Blog)
Secure access with inlets PRO

As you might know from my previous post, I’m running some Raspberry Pi clusters in my home lab. To get SSH access from anywhere to those little compute units in my private network, I could set up a VPN, but instead I’m a profound user of inlets PRO, a Cloud Native Tunnel for L4 TCP traffic. Using inlets, you can give any Raspberry Pi a public IP address by creating an exit-node on a public cloud provider of your choice. Giving SSH access to a private node with inlets PRO is a common scenario and is explained in detail in this tutorial by Alex Ellis
This is not the only use case of inlets; it is, in fact, a powerful tool and can be used for multiple purposes (taken from the documentation):
For companies - hybrid cloud, multi-cluster and partner access
- Low-maintenance, secure, and quick alternative to a VPN
- To build a hybrid cloud between existing servers and public cloud for
- To migrate on-premises databases and APIs to public cloud
- To connect to the private environments of your customers in a SaaS product
For teams and individuals - for public tunnels and Kubernetes connectivity
- As a zero-touch VPN - penetrating NAT, firewalls, captive portals and hotel WiFi
- When integrating with API that uses webhooks such as Stripe, PayPal or GitHub, you can test live with your local machine
- To access your home lab, Owncloud instance, FreeNAS, or Raspberry Pi cluster using SSH and HTTPS
- As an alternative to SaaS and or proprietary offerings such as Ngrok and Argo Tunnel where you can use your own DNS, and decide your own rate-limits
Secure access with Boundary & inlets PRO
While I can use inlets PRO to give myself access to my private nodes from anywhere, I still have to distribute SSH keys when I want to give a friend or colleague temporary access. Also, because my clusters have many units, all of them need to be exposed with inlets PRO, or the secure tunnel needs to be created on request, if you want to connect to them. This can become quite a challenge to manage and maintain. This is exactly what Boundary tries to solve. It provides a secure way to access hosts and critical systems without having to manage credentials or expose your network
So I was wondering what it would take to use HashiCorp Boundary, in combination with inlets PRO, to give friends and colleagues access to my SBCs.
The idea here is to install Boundary on a single node of my clusters, and expose this service via an exit-node with inlets PRO.
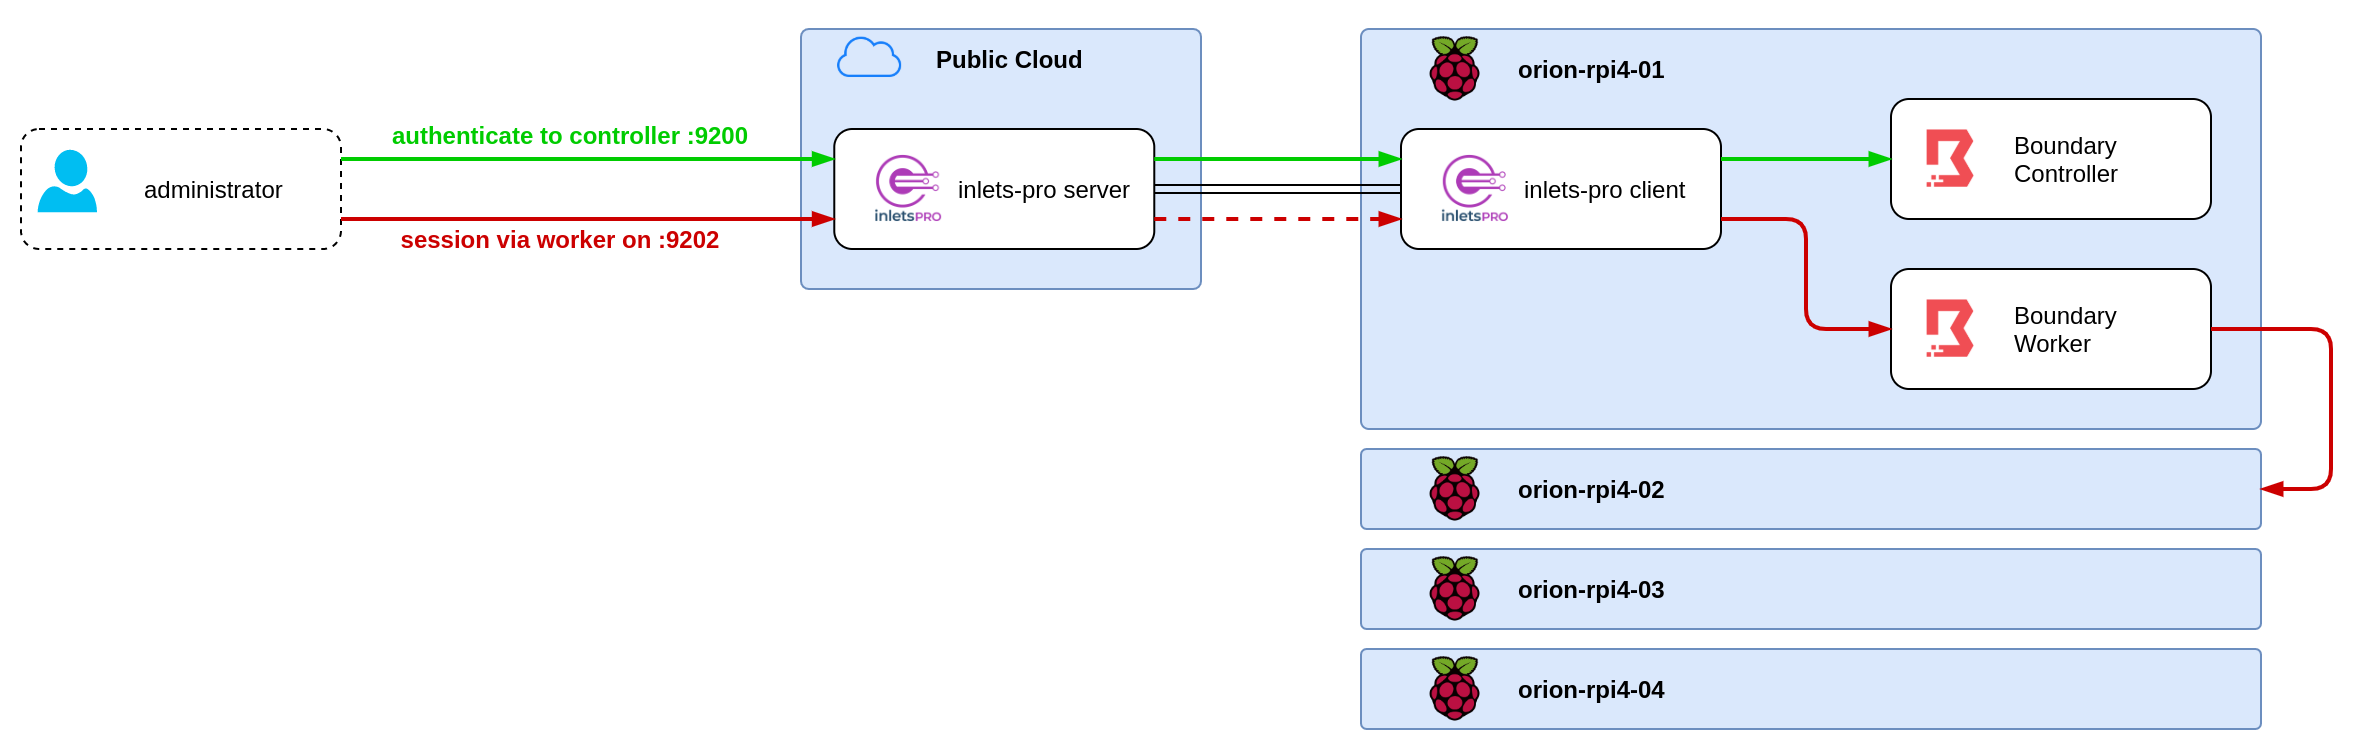
Boundary and inlets PRO for your Raspberry Pi cluster
Tutorial
For this setup, I took a cluster of four Raspberry Pis, running Ubuntu 20.04, all with a proper hostname and a static IP address.
- orion-rpi4-01 (192.168.0.51)
- orion-rpi4-02 (192.168.0.52)
- orion-rpi4-03 (192.168.0.53)
- orion-rpi4-04 (192.168.0.54)
All of them have the SSH server enabled, and for the time being, only one user with name ubuntu is created. One the first one, we are going to install all the components of Boundary:
Here’s the workflow for the tutorial:
- Install
inlets-proandinletsctl - Create a tunnel and an exit-sever with a public IP
- Install Postgres
- Install Boundary
- Configure and start a Boundary Controller service
- Configure and start a Boundary Worker service
Get a public IP
First, let’s give our Raspberry Pi a public IP address.
Grap yourself a inlets PRO license, download inletsctl and use it to get the inlets PRO client:
curl -sSLf https://inletsctl.inlets.dev | sudo sh
sudo inletsctl download --pro
Now create an exit-node for your favourite cloud. I’m going to use DigitalOcean, which happens to be the fastest and cheapest.
inletsctl create  \
  --provider digitalocean \
  --access-token-file ~/do-access-token \
  --pro
When the program completes running, you’ll be presented with a command you can run to connect to the tunnel and start proxying traffic. Have a close look at this output, because it has the required auth token and the remote URL you will later to create the client-side of the tunnel.
In my case, the public IP address was 178.62.111.14 and the token kHPqUgb80hE90DkzWiNWtB0BUr2AbUGPBPDw9ozUqAdTjIfdj0R41iLjffbzObgC. During the tutorial, those values are used in several scripts and configuration files, so if you are following along, replace them with your correct values.
Next, on the Raspberry Pi, create the systemd service for the inlets PRO client and start the client part of the tunnel.
export LICENSE=""
inlets-pro client --generate=systemd \
  --url "wss://178.62.111.14:8123/connect" \
  --token "kHPqUgb80hE90DkzWiNWtB0BUr2AbUGPBPDw9ozUqAdTjIfdj0R41iLjffbzObgC" \
  --license "$LICENSE" \
  --port 9200 \
  --port 9202 \
  --upstream "127.0.0.1" | sudo tee -a /etc/systemd/system/inlets.service

sudo systemctl enable inlets
sudo systemctl start inlets
Neat, at this moment, all TCP traffic on port 9200 and 9202 of the public VM is tunnelled towards the Raspberry Pi, although nothing is serving something on those ports yet.
Install Postgres, create the database and a user
Because I’m running Ubuntu 20.04, the easiest way to install Postgres is using apt
sudo apt update
sudo apt install postgresql
When installed, connect to Postgres and create a database and a user for Boundary:
sudo -u postgres createuser -s -w boundary
sudo -u postgres psql -c "ALTER ROLE boundary WITH PASSWORD '<your preferred password>';"
sudo -u postgres psql -c "CREATE DATABASE boundary;"
sudo -u postgres psql -c "GRANT ALL PRIVILEGES ON DATABASE boundary TO boundary;"
Download Boundary
Download the Boundary binary and install it in the correct place:
curl -o "boundary.zip" -sfL "https://releases.hashicorp.com/boundary/0.1.1/boundary_0.1.1_linux_arm64.zip"
sudo unzip -qq -o "boundary.zip" -d /usr/local/bin
and verify the installation:
$ boundary version

Version information:
  Git Revision:        eccd68d73c3edf14863ecfd31f9023063b809d5a
  Version Number:      0.1.1

$
Great! All set and ready to go.
Install Boundary Controller and Worker
Configuration
Before starting a Boundary controller and worker, we have to create the proper configuration files and initialize the database. Create the two files:
- /etc/boundary/controller.hcl
disable_mlock = true

controller {
  name = "orion-rpi4-01"

  database {
      url = "postgresql://boundary:<your preferred password>@localhost/boundary"
  }
}

listener "tcp" {
  address = "127.0.0.1"
  purpose = "api"
  tls_disable = true
}

listener "tcp" {
  address = "127.0.0.1"
  purpose = "cluster"
  tls_disable = false
}

kms "aead" {
  purpose = "root"
  aead_type = "aes-gcm"
  key = "sP1fnF5Xz85RrXyELHFeZg9Ad2qt4Z4bgNHVGtD6ung="
  key_id = "global_root"
}

kms "aead" {
  purpose = "worker-auth"
  aead_type = "aes-gcm"
  key = "8fZBjCUfN0TzjEGLQldGY4+iE9AkOvCfjh7+p0GtRBQ="
  key_id = "global_worker-auth"
}

kms "aead" {
  purpose = "recovery"
  aead_type = "aes-gcm"
  key = "8fZBjCUfN0TzjEGLQldGY4+iE9AkOvCfjh7+p0GtRBQ="
  key_id = "global_recovery"
}
- /etc/boundary/worker.hcl
listener "tcp" {
    purpose = "proxy"
    tls_disable = false
}

worker {
  name = "orion-rpi4-01"

  controllers = [
    "127.0.0.1"
  ]

  public_addr = "178.62.111.14"
}

# must be same key as used on controller config
kms "aead" {
    purpose = "worker-auth"
    aead_type = "aes-gcm"
    key = "8fZBjCUfN0TzjEGLQldGY4+iE9AkOvCfjh7+p0GtRBQ="
    key_id = "global_worker-auth"
}
Some parts of the configuration need a little bit of explanation:
- all the listeners are bind to 127.0.0.1, keeping everything private. Both the controller API and the worker are exposed via the inlets PRO tunnel.
- For simplicity of this tutorial, TLS is disabled for the API. This is of course, not the recommended approach, so do enable this for production.
- the public address of the worker is set to the public IP address of the exit-node
Initialize the database
With those two files in place, now it is time to initialize the database:
sudo boundary database init -config /etc/boundary/controller.hcl
Take note of the Initial auth information part of the output, because you will need it later to authenticate on Boundary.
Initial auth information:
  Auth Method ID:     ampw_1ALMo45VQB
  Auth Method Name:   Generated global scope initial auth method
  Login Name:         admin
  Password:           oLKRhlzUGLDUcw4yA6jX
  Scope ID:           global
  User ID:            u_2taxYtcqkO
  User Name:          admin
Install the services
What is left to do, is installing both the Boundary controller service and a Boundary worker service.
Here’s a simple install script that creates the boundary group and user, installs the systemd unit file and enables it at startup:
#!/bin/bash
# Installs the boundary as a service for systemd on linux
# Usage: ./install_boundary.sh <worker|controller>

TYPE=$1

sudo tee /etc/systemd/system/boundary-${TYPE}.service >/dev/null<< EOF
[Unit]
Description=boundary ${TYPE}

[Service]
ExecStart=/usr/local/bin/boundary server -config /etc/boundary/${TYPE}.hcl
User=boundary
Group=boundary
LimitMEMLOCK=infinity
Capabilities=CAP_IPC_LOCK+ep
CapabilityBoundingSet=CAP_SYSLOG CAP_IPC_LOCK

[Install]
WantedBy=multi-user.target
EOF

sudo adduser --system --group boundary || true
sudo chown boundary:boundary /etc/boundary/${TYPE}.hcl

sudo chmod 664 /etc/systemd/system/boundary-${TYPE}.service
sudo systemctl daemon-reload
sudo systemctl enable boundary-${TYPE}
sudo systemctl start boundary-${TYPE}
./install_boundary.sh controller
./install_boundary.sh worker
Try it out
Now that all services are running, open a browser and go to http://178.62.111.14:9200/ If everything went well, you should see the UI of Boundary, and you can log in with the credentials created when initializing the database.
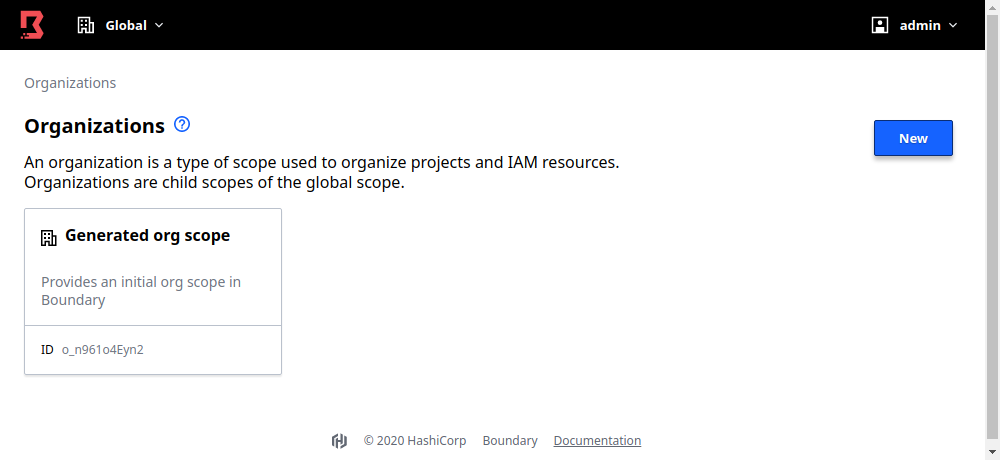
When you log in for the first time, you will notice a generated organization and project which gives you a head start. HashiCorp has also foreseen a Terraform provider for Boundary, which is pretty convenient for configuring all your resources like organizations, projects, accounts, roles, hosts and targets.
Have a look at the following Terraform manifest. With this Terraform configuration, a minimal set of resources is created for me the connect to all my Raspberry Pis in my cluster.
provider "boundary" {
  addr                            = "http://178.62.111.14:9200"
  auth_method_id                  = "ampw_1ALMo45VQB"
  password_auth_method_login_name = "admin"
  password_auth_method_password   = "oLKRhlzUGLDUcw4yA6jX"
}

variable "raspberry_pi_ips" {
  type = set(string)
  default = [
    "192.168.0.51",
    "192.168.0.52",
    "192.168.0.53",
    "192.168.0.54",
  ]
}

resource "boundary_scope" "global" {
  global_scope = true
  scope_id     = "global"
}

resource "boundary_scope" "orion_org" {
  name                   = "Orion Org"
  description            = "A prominent constellation located on the celestial equator and visible throughout the world"
  scope_id               = boundary_scope.global.id
  auto_create_admin_role = true
}

resource "boundary_scope" "orion_project" {
  name                   = "Orion Project"
  scope_id               = boundary_scope.orion_org.id
  auto_create_admin_role = true
}

resource "boundary_host_catalog" "orion_catalog" {
  name     = "Orion Catalog"
  type     = "static"
  scope_id = boundary_scope.orion_project.id
}

resource "boundary_host" "orion_servers" {
  for_each        = var.raspberry_pi_ips
  type            = "static"
  name            = "Orion Server ${each.value}"
  address         = each.key
  host_catalog_id = boundary_host_catalog.orion_catalog.id
}

resource "boundary_host_set" "orion_ssh_servers" {
  type            = "static"
  name            = "Orion SSH Servers"
  host_catalog_id = boundary_host_catalog.orion_catalog.id
  host_ids        = [for host in boundary_host.orion_servers : host.id]
}

resource "boundary_target" "orion_ssh_target" {
  type         = "tcp"
  name         = "Orion SSH"
  scope_id     = boundary_scope.orion_project.id
  default_port = "22"

  host_set_ids = [
    boundary_host_set.orion_ssh_servers.id
  ]
}

resource "boundary_auth_method" "orion_passwords" {
  name     = "Orion Passwords"
  scope_id = boundary_scope.orion_org.id
  type     = "password"
}

resource "boundary_account" "johan_siebens" {
  name           = "Johan Siebens"
  type           = "password"
  login_name     = "jsiebens"
  auth_method_id = boundary_auth_method.orion_passwords.id
}

resource "boundary_user" "johan_siebens" {
  name     = "Johan Siebens"
  scope_id = boundary_scope.orion_org.id
  account_ids = [
    boundary_account.johan_siebens.id
  ]
}

resource "boundary_role" "login_and_default_grants" {
  name = "Login and Default Grants"
  principal_ids = [
    boundary_user.johan_siebens.id
  ]
  grant_strings = [
    "type=scope;actions=list",
    "id=*;type=auth-method;actions=authenticate,list",
    "id={{account.id}};actions=read,change-password"
  ]
  scope_id = boundary_scope.orion_org.id
}

resource "boundary_role" "operator" {
  name = "Operator"
  principal_ids = [
    boundary_user.johan_siebens.id
  ]
  grant_strings = [
    "type=scope;actions=list",
    "id=*;type=target;actions=authorize-session"
  ]
  scope_id = boundary_scope.orion_project.id
}
Connect to Your First Target
Open a command terminal, and authenticate with Boundary:
$ boundary authenticate password -auth-method-id=ampw_RYQBQxmaER -login-name=jsiebens -password=MySecretPassphrase -addr=http://178.62.111.14:9200

Authentication information:
  Account ID:      apw_Nr488XiJL8
  Auth Method ID:  ampw_RYQBQxmaER
  Expiration Time: Sun, 01 Nov 2020 13:29:03 CET
  Token:
  at_cPWxjsyvRr_s12CAW4a2EjzVgtMpdsHkGZUzsV3mUWM2iWSEPWCvuuUfn9jvTv24E9Vk8Cyq87P8tFX3F6uJwHnaG53QWF2AQeZvZUUMPejpzNWsJby1QTUgwhTq5MrDPT1LgP1gcSpZFEcP4ew
  User ID:         u_JfCE2r2302
Use the boundary connect command to SSH into the Raspberry Pi
$ boundary connect ssh -target-id ttcp_KQHBRImVWu -addr=http://178.62.111.14:9200
Welcome to Ubuntu 20.04.1 LTS (GNU/Linux 5.4.0-1015-raspi aarch64)

 * Documentation:  https://help.ubuntu.com
 * Management:     https://landscape.canonical.com
 * Support:        https://ubuntu.com/advantage

  System information as of Sun Oct 25 12:31:39 UTC 2020

  System load:  0.27               Temperature:           49.7 C
  Usage of /:   17.2% of 14.30GB   Processes:             155
  Memory usage: 22%                Users logged in:       1
  Swap usage:   0%                 IPv4 address for eth0: 192.168.0.53

 * Introducing autonomous high availability clustering for MicroK8s
   production environments! Super simple clustering, hardened Kubernetes,
   with automatic data store operations. A zero-ops HA K8s for anywhere.

     https://microk8s.io/high-availability

98 updates can be installed immediately.
46 of these updates are security updates.
To see these additional updates run: apt list --upgradable


Last login: Sun Oct 25 06:28:21 2020 from 192.168.0.111
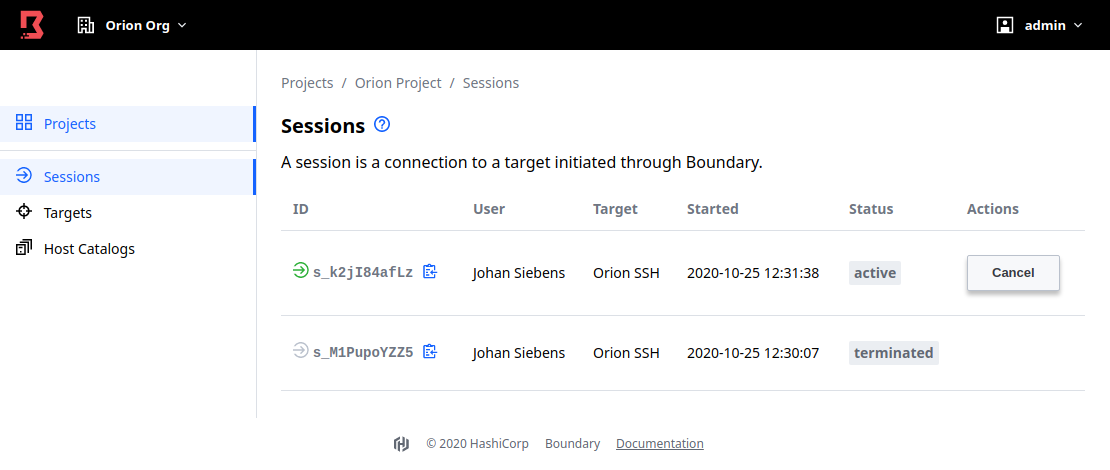
In the admin console, select Sessions. The UI will show an entry with session ID matching in the server log.
Conclusion
During this tutorial we deployed HashiCorp Boundary on a single node of the Raspberry Pi cluster. Both the Boundary Controller and the Boundary Worker are exposed with a public endpoint using inlets-pro.
By doing so, you can easily access all the nodes of your private cluster from anywhere. With Boundary, it became straightforward to give someone else access by simply creating an account and the required permissions.
See also:
References:
boundaryhashicorprpiRaspberry Piinletsinfosecdevopsdevsecopsinfrastructurevpnhybrid cloud
2379 Words
Oct 25, 2020